
Lemosho noordelijke route
Kilimanjaro Lemosho Glades noordelijke route.
De 7 en 8 daagse Lemosho Glades routes via de noordelijke kant van de Kilimanjaro met uitzicht over Amboseli NP in Kenia, heeft het voordeel niet samen te vallen met de meer gebruikte Machame en Umbwe route.
Deze schitterende variaties op de Shira Route wordt nog weinig gebruikt. Het slagingspercentage bij de door ons georganiseerde beklimmingen is bij de 8 daagse route met > 90% zeer hoog en daarom wordt deze route door ons aanbevolen.
Duur: 8 dagen
Verblijf: campsites
Kilimanjaro: Tenten
Hoogte en afstandstabel:
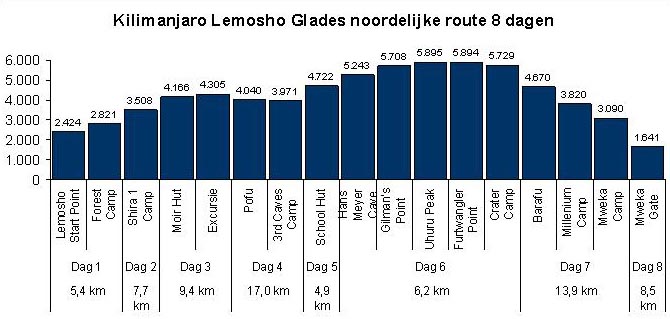
Lemosho Glades noord hoogte tabel
Avond voor de start van de beklimming.
Rond 18:00 in de avond voor de start van de beklimming wordt u door de hoofdgids van uw beklimming in de lodge opgezocht voor de breefing. U krijgt advies over uw bagage die door de dragers meegnomen moet worden en over de inhoud van uw daypack. Hij zal daarnaast ook eventueel huurmateriaal zoals slaapzakken en stokken aan u overhandigen.
Dag 1. Transfer en registratie.
U wordt van uw lodge met Landrovers en Landcruisers opgehaald en u rijdt naar een punt waar u zich met de dragers en de overige crew voor de beklimming samenvoegt. Hierna rijdt u gezamenlijk naar de Londorosi Gate waar u zich met uw paspoort moet registreren.
Na de registratie is het nog ongeveer 12 km naar het startpunt van de beklimming. Wanneer de weg in slechte conditie is, kan het niet veilig genoeg zijn of zelfs onmogelijk worden om u op het eindpunt af te leveren en moet de laatste 1,9 km te voet worden afleggen.
Van Londorosi gate naar startpunt.
Als de driver u bij het startpunt aflevert, dan is het gebruikelijk hem een fooi $5 – $10 per groep te geven.
Bij het startpunt gebruikt u de lunch.
Vanaf het Lemosho Start Point (2.424m) tot het Forest Camp (2. 821m) bedraagt de afstand 5,4 km, met een hoogteverschil van 397 m. Op dit gedeelte van de beklimming zult u veel vogels en klein wild zoals de White Colobus monkey en de Dik-Dik tegen komen.
Dag 2, Van Forest Camp naar Shira One Camp (3.508m) op de westelijke rand van het Shira Plateau, een hoogteverschil van 687m.
Terwijl u het landschap langzaam ziet veranderen van een tropisch regenwoud naar een heide gebied kunt u vandaag voor de eerste keer de top van de Kilimanjaro te zien krijgen.
Het is normaal als u op deze hoogte enige last van hoofdpijn krijgt. De hoofdgidsen zullen u daarvoor waarschijnlijk Ibuprofen of Diamox voorschrijven.
De afstand naar Shira One is 7,7 km.
U kunt hier een hoogte excursie naar de Shira Ridge 3.959m maken (Kilimanjaro’s derde vulkanische top). Hierna daalt u af naar Shira One om te overnachten.
Tussen Forest Camp en Shira One camp: het eerste gezicht op de toppen van de Kilimanjaro!
Shira One Camp (3.508m)
Dag 3. Shira One Camp (3.508m) naar Moir Hut (4.166m) over het Shira Plateau.
Een geweldig mooie tocht door het heide gedeelte van de Kilimanjaro die u bij Moir Hut tot vlak onder de pieken brengt.
Hoogteverschil 658m, afstand 9,4km.
Over het Shira plateau naar Moir camp (4.166m)
Eventueel wordt er een acclimatisatieklim naar 4.305 m uitgevoerd om voor de overnachting weer naar het kamp af te dalen.
Dag 4. Met de klok mee over de noordelijke hellingen van de Kilimanjaro van Moir Hut (4.166m) naar Pofu camp (4.040m).
Hoewel dalend, zeker geen gemakkelijke dag, vanwege de vele rotsige kloven die overgestoken moeten worden. Afstand 9 km.
Dag 5. Pofu camp (4.040m) – 3rd Caves Camp. (3.971m)
Licht dalend, maar makkelijker dan dag 4 omdat de kloven op dit traject minder diep liggen.
3rd Cave Camp (3.971m)
Vanaf 3rd Cave Camp heeft u mooi gezicht op de top van de Kilimanjaro en ’s avonds op de verlichte dorpen aan de kant van Kenia.
Dag 6 / 7 Van 3rd Caves Camp (3.971m) naar School Hut (het basis camp op 4.722m), top poging en afdaling naar Millenium Camp.
Vertrek in de ochtend om zo vroeg als mogelijk in het basis kamp aan te komen.
Een geleidelijk stijgend pad met een hoogtewinst van 751 m en een afstand van 4,9 km.
3rd Cave naar Schoolhut
School Hut (4.722m)
In het basis kamp worden de laatste voorbereidingen voor de top poging gedaan.
Na aankomst doet u nog een acclimatisatie klim. Na een vroeg diner gaat u naar bed om rond 23:00 gewekt te worden om aan het laatste deel van de beklimming te beginnen. Aan de hand van de conditie en stijgsnelheid van de groep zal uw gids de precieze starttijd bepalen
U gaat vanaf School Hut (4.722m) via Hans Meyer Cave (5.243m) en Gilman’s Point (5.708m) naar Uhuru Peak (5.895m).
Het lied Malaika, gezongen op de Kilimanjaro op een hoogte van 5.500m tijdens de nachtelijke beklimming naar Gilman’s Point.
Dit laatste gedeelte – met name de laatste 550m – is zeer zwaar en u zult moeten vechten om de top te bereiken. Ongetwijfeld krijgt u het gevoel te willen gaan slapen wat u zult moeten overwinnen.
Als u rust, ga dan niet liggen en doe de ogen niet dicht. U moet op dit punt uw gids vertrouwen in zijn oordeel of u verder kunt gaan of dat er een potentieel gevaarlijke situatie ontstaat waardoor u de beklimming niet verder kunt doorzetten.
Misselijkheid en hoofdpijn zijn op deze hoogte normaal en ongeveer een kwart van de klimmers zal voor of op Gilman’s Point overgegeven hebben. Hoewel dit zeer onaangenaam is, hoeft dat geen indicatie te zijn dat u de tocht niet verder kunt maken. Het is zeer belangrijk dat u met uw gids blijft communiceren zodat hij uw situatie goed kan blijven inschatten.
Op Gilman’s Point, op de rand van de krater, kunt u uitrusten en waarschijnlijk van de zonsopgang genieten.
Hiervandaan heeft u een schitterend uitzicht op Mawenzi en de oostelijke ijsvelden.
Misschien dat u hiervandaan zou willen omkeren, maar u kunt Uhuru Peak al zien liggen en heeft nog maar 187 verticale meters te gaan. Onderweg heeft u voldoende tijd om uit te rusten en is het uitzicht ronduit schitterend!
Op weg naar de top.Uhuru Peak! 5.895 m
Op de top zal de gids u vertellen hoe lang u daar kunt verblijven. Dit is afhankelijk van uw conditie, snelheid en de weersgesteldheid.
De afdaling gaat van Stella Point (5.752m) via een lunch bij Barafu Camp (4.681m) naar Millenium Camp (3.820m).
Vergeet u niet dat ook de afdaling een belangrijk deel van de tocht uitmaakt.
U daalt af via de Mweka Route die voornamelijk uit puinsteen bestaat en een stevige aanslag op de beenspieren zal plegen.
Dag 8. Naar de Mweka Gate 1.641m
In de morgen daalt u over een bospad door het tropisch regenwoud af van het Millenium Camp naar de Mweka Gate (1.641m) om daar het summit register te tekenen.
De Mweka Gate is een goede plaats om de tipping ceremony met de crew uit te voeren.De fooien voor de crew bedragen ongeveer 10-15% van de klim kosten. Het totaal van de fooien wordt bij de Gate aan de hoofdgids overhandigd en aan de crew bekend gemaakt. Uw fooi wordt daarna door de gidsen eerlijk verdeeld naar rato van inzet, verantwoordelijkheid en de ervaring van ieder crew lid.
Indicatie kosten 8 daagse Kilimanjaro beklimming Lemosho noordelijke route:
Bij een groep van 4 personen: € 2.845 per persoon bij een USD-EUR koers van 1,00.
Antwoorden op veel gestelde vragen over Kilimanjaro beklimmingen.
| Terug naar: | Prive Safari |
| Hoofd pagina: | Kilimanjaro beklimmingen |
| Deze pagina: | Lemosho noordelijke route |
| Interessante link | Kilimanjaro Park |


")


